It's common for the connectors at the HVAC resistor pack on 2005/2006 Elise/Exiges, mounted on the HVAC blower, to corrode. The corrosion results in excessive heat, which results in the insulation melting away, and then a short to ground burns the connector and blows the fuse.
If you haven't had this happen yet on your car, Lotus has a (Technical Support Bulletin) TSB that describes drilling a hole through the bonded aluminum panel in the bottom of the car to drain moisture from the area. I don't know that I would do that, when a better fix is available.
To repair the problem, a Lotus dealer recommends replacing the blower fan and resistor pack. The
replacement resistor kit from Lotus is around $300, but only $170 from other sources. In the typical case, there is nothing wrong with the blower. I think Lotus recommends changing it out because the orange wire that runs between the resistor pack and the blower motor (~6 inches of wire), becomes corroded inside the insulation and Lotus mechanics don't want to bodge together a replacement wire, so they replace the blower, which comes with a new wire. The kit for the resistor pack relocates the resistors to a higher location, so the assembly doesn't sit in moisture. The resistors shed heat, so they still need to be mounted in a location that receives airflow when the blower is running. The main problem with simply replacing the blower motor and resistors as Lotus recommends is that the clam must be removed, the R134 refrigerant evacuated, and the HVAC box removed. The cost comes close to $2,000. It turns out that
some adventurous and clever folks figured out an easier and quicker way to fix this problem and posted the method on the LotusTalk forums.
Lotus originally perforated the driver's and passenger floor of the Elise to use as the air return for the blower assembly. Lotus then blocked off the driver's side completely with a thin aluminum panel and installed a deflector plate on the passenger side. The working theory is that these actions were taken in response to draft concerns when the recirculation flap is open and the blower is off. In this condition, air flow coming in the front of the car is allowed to pass through cut-outs in the crash structure, through the inlets. and into the cabin through the perforated holes in the floor. The downside of blocking the drafts is that air output from the air conditioning is negatively affected. The blower motor corrosion fix will also provide and opportunity to reopen the floor inlets. On the specific car I worked on, there was also an audio amplifier blocking the airflow on the passenger side, so I have to wonder how much airflow was actually coming from the vents.
The fix involves cutting out a window section of the aluminum floor around the existing perforations so that you can cut and extend the existing blower motor wire and bypass or replace the resistor pack.
- Remove the access grills below the windshield
- Open both doors, turn off the courtesy light
- Remove the driver's seat
- Remove the center console to prevent cracking it
- Remove the passenger side storage area
- Remove the stereo
- Remove the front access panels over the brake booster and fuse box
- I put down foam padding to smooth things out around the shifter
- Find an assistant. The assistant does not need to be mechanically inclined, but simply sits in a chair and hands you what you need and manages cords because you won't have much room to move around.
-
Lay out the tools you'll need for the job in front of the assistant and explain what each one is called
- Vacuum cleaner with hose
- Drill and 3/16" bit
- Air die grinder, arbor, and cut-off wheels (electric version if you don't have a large compressor)
- An assistant (need not be mechanically inclined)
- Sharpie pen
- Wire cutters - smaller is better
- 1/4" die grinder with cutting wheel arbor and cutting wheels
- Flat file
- Duck tape
- 9-12 feet of 12 AWG Marine Grade wire
- Wire stripper
- Wire Crimper
- 12 AWG butt splice connector
- Heat shrink tubing
- Lighter
- Vacuum cleaner with hose
- Claw style pickup tool
- Non-petroleum-based lubricant
- Flash light and possibly a mirror
- Eye Protection/Hearing Protection
- Strip and crimp a butt splice connector onto your 12 AWG wire
- Use the sharpie to draw the outline of the existing aluminum panel
- Drill out the rivets using a 3/16" drill bit. I find that works better than matching the 1/8 rivet size, but only drill until the rivet breaks free.
- Remove the aluminum panel
- Use the die grinder to carefully cut the area inside the sharpie marking
- File the sharp edges
- Cover the edges with duck tape
- Vacuum out the car as there will be aluminum bits everywhere
- Cut the little zip tie retaining the blower motor wires
- Reach in and pull on the resistor end of the orange wire without disconnecting the blower end connector
- If you're lucky (?) the end will be so corroded/burnt that it will come out without cutting
- Cut, strip, and clean the end of the wire (I used Vinegar and salt solution, but remove with water when done)
- Butt splice the 12 AWG wire onto the clean and stripped orange wire
- Push the loose end of the wire straight up at 12 o'clock through the blower motor foam insulation
- Use the claw pick-up tool and a flash light to grab the wire and pull it up
- Use the claw pick-up tool to route the wire under the brake booster and fresh air ducts over to the rubber plug under the fuse box
- Push a couple of feet of convoluted tubing onto the wire to protect it
- Lubricate the wire and push it through the rubber plug - be careful not to pierce the plug
- Route the wire up into the passenger side storage area
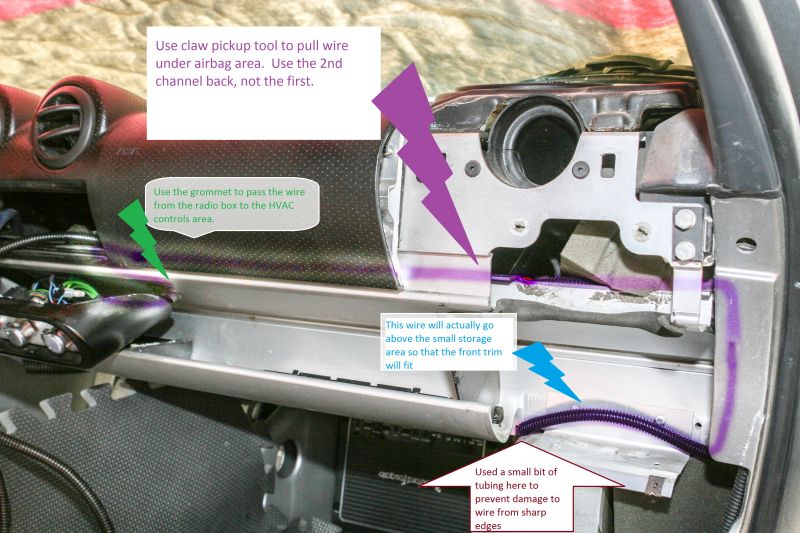
- Protect the wire from sharp edges using a bit of hose or tubing
- Run the wire up along the hinge area into the area above the storage area
- Route the wire up into the radio area by pulling the wire under the air bag using the 2nd channel back
- Route the wire down into the HVAC grommet (may be under a taped down plastic panel)
- Connect the new wire to the high speed position on the switch
- Reinstall the stereo, access panels, storage area trim, center console, and driver's seat
- Install an aluminum panel approximately 3.5" by 10.5" with either rivets, plastic rivets, or velcro tape. It's best if this panel is perforated as the A/C is improved at the expense of some winter draft, unless you tape up the fresh air vents in the crash structure.
Blower:
SPAL 007-A42-32D, 12 Volt
Resistors:
The resistors themselves are around $20 and
are shown here.
Arcol 284-HS50-0.05
Arcol 284-HS50-0.22
Arcol 284-HS50-0.27
Click the image below to see a higher resolution image.
Dash Wiring
 Last update: Dec 7th, 2019

